~ Warna Biru ~
  • HOME
  • Download Movie
  • Travel
  • Features
    • Tips Beauty
    • MoneyMagnet
      • Fingo
      • Halo Telco
      • Dropship
    • Motivation
  • Contact Me


Apple’s iCloud service is a great way to store documents and backups in the cloud, but the space isn’t unlimited. Here’s how to check how much free space you have left in your iCloud account on an iPhone, iPad, or Mac.

How to Check iCloud Storage Space on iPhone or iPad

Checking your available iCloud storage space is easy on an iPhone or iPad. First, open the Settings app. In Settings, tap your Apple account avatar or name.

In Settings on iPhone or iPad, tap your account avatar icon or name.

On your account screen, scroll down and tap “iCloud.”

Tap "iCloud."

On the iCloud summary page, you’ll see a bar graph that depicts how much of your iCloud storage space is in use. To figure out how much is left, subtract the amount used from the total amount of space available.

In this example, we have 5GB total and 2.4GB in use. 5 – 2.4 = 2.6, so we have 2.6GB available in our iCloud account.

In iCloud, you'll see a bar graph of how much space is in use.

If you want to get more details about how your iCloud space is being used, tap “Manage Storage” just below the graph. On that screen, you’ll have the option to clear iCloud storage used by certain apps.

How to Check iCloud Storage Space on Mac

To check your free iCloud storage space on a Mac, open System Preferences. Next, sign in to iCloud if you haven’t done so already. Then click “Apple ID.”

In System Preferences, click "Apple ID."

On the “Apple ID” screen, click “iCloud” in the sidebar. You’ll see your available storage listed in a bar graph at the bottom of the app list.

Click "iCloud" in the sidebar, then you'll see free space listed in the bar graph.

To get more details about how much space each iCloud-enabled app is using, click the “Manage” button beside the storage bar graph.

What to Do If You’re Running Low on iCloud Space

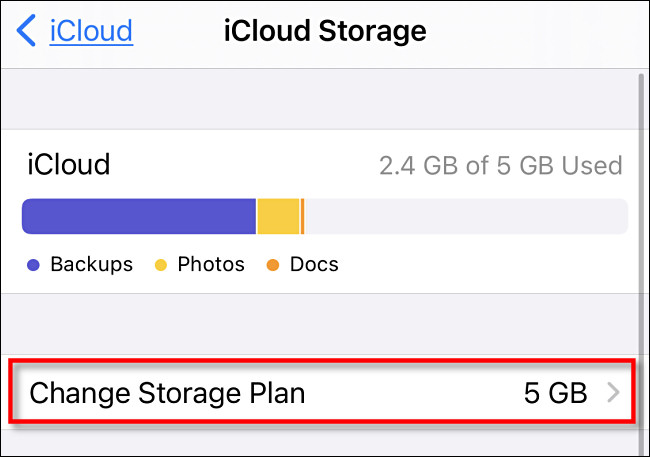
If you’re running out of available space on iCloud, it’s easy to upgrade your storage plan for a monthly subscription fee. To increase your storage on an iPhone or iPad, launch Settings and tap your Apple account avatar icon. Then tap iCloud > Manage Storage > Change Storage Plan.

In iCloud Storage, tap "Change Storage Plan."

On a Mac, open System Preferences and click “Apple ID.” Then click “iCloud” in the sidebar and select “Manage…” in the lower corner of the Window. When a new window pops up, click “Buy More Storage” and you can select a new iCloud storage plan.

The iCloud Upgrade iCloud Stroage menu on a Mac in Big Sur.

Alternately, you can also free up iCloud storage by deleting older device backups or potentially storing your photos and videos somewhere else (but be careful that you don’t delete anything you don’t have backed up). Good luck!

Credit to: How To Geek - Benj Edwards


If you’ve accidentally deleted a note in Microsoft OneNote, don’t panic. There’s a good chance your deleted note is still available in a OneNote backup. Here, we’ll show you how to recover your notes in OneNote for Windows, Mac, and the web.

Restore Deleted Notes in OneNote on Windows

OneNote has two versions for Windows: OneNote (formerly called OneNote 2016) and OneNote for Windows 10.

The steps to recover deleted notes aren’t the same for both versions, so you’ll need to find out what version of OneNote you’re using first.

To do this, open the “Start” menu and search for “OneNote.” Notice the name of the app that you usually click to access your notes. Compare that name with the names listed above to find out your version of OneNote.

Then, depending on the version you use, follow the steps in one of the sections below to recover your deleted notes in OneNote.

Get Back Deleted Notes in OneNote (formerly OneNote 2016)

OneNote automatically creates backups of your notes by default. This means that if you ever delete a note, you can restore it later from these OneNote backups.

To start the process of recovering your lost notes, open the “Start” menu, search for “OneNote,” and click the app in the results.

Launch OneNote

When the OneNote window opens, click “File” in the top-left corner of the window.

The File menu in OneNote

Here, select “Info” from the left sidebar, then click “Open Backups” on the right.

Open OneNote backups

A window will open showing your notebooks (as folders) that were backed up. Double-click the notebook folder that you want to restore notes from, then select the notes section and click “Open.”

Restore a OneNote backup

The selected note will open on your screen. Here, right-click the note’s section or page name at the top and select “Move or Copy.” This will help restore your note into your existing notebooks.

Move or copy OneNote notes

In the window that opens, select the notebook that you want to restore the deleted notes into and hit “Copy” at the bottom.

Restore deleted OneNote notes

Your selected notes are now available in your existing notebook.

If you don’t prefer local backups, you can sync OneNote with your Microsoft account. This keeps a copy of all your notes in the cloud, and you can access them from any of your compatible devices.

Recover Deleted Notes in OneNote for Windows 10

If you use OneNote for Windows 10, you don’t need to open a backup file to restore notes. There’s a built-in option in this app that helps you view and recover your removed notes.

This option retrieves your notes from your Microsoft account’s cloud storage—which is where your notes are originally stored.

To begin the recovery process, access your “Start” menu, search for “OneNote for Windows 10,” and click the app in the results.

Access OneNote for Windows 10

In the OneNote window, click “View” in the top menu bar.

The View menu in OneNote

Under the View menu, click the “Deleted Notes” option.

Deleted notes in OneNote

You can now see all your deleted notes and sections. Find the note that you want to recover, then right-click it and select “Restore To.”

Restore deleted OneNote notes

OneNote will ask where to restore your notes. Select the existing notebook that you want to add these deleted notes into and click “Restore.”

Select a notebook to restore notes into

Recover Deleted Notes in OneNote on Mac

OneNote for Mac also doesn’t require you to open a backup file to restore notes. You can use a built-in option in the app to find and recover your deleted notes.

To begin, open Spotlight by pressing Command+Spacebar, type in “OneNote,” and select the app in the search results.

Launch OneNote on Mac

Click “View” in the OneNote window.

The View menu in OneNote for Mac

Select “Deleted Notes” in the View menu.

Deleted notes in OneNote for Mac

OneNote will now display all your deleted notes. To restore a note, right-click it and select “Restore To.”

Recover notes in OneNote for Mac

On the next screen, choose the existing notebook to add these recovered notes into and click “Restore.”

Choose notebook to add notes into

Without further prompts, your selected notes will be recovered.

Recover Deleted Notes in OneNote on the Web

OneNote for web works pretty much the same as OneNote for Windows 10. It syncs your notes to your OneDrive account and lets you recover your notes from within the app.

Head over to OneNote on the web and log in to your account to start notes recovery. Then, click the View > Deleted Notes option to view your lost notes.

Deletes Notes option in OneNote for web

Right-click the note that you want to recover and select “Restore.” Choose your existing notebook to add this note into and hit “OK.”

If you’ve deleted an entire notebook, you’ll need to restore it in OneDrive first before using it in OneNote for web. This notebook can be recovered from OneDrive’s recycle bin as long as it hasn’t already been 30 days since you deleted it.

To recover your full notebook, open the OneDrive site in your browser and log in to your account.

When OneDrive loads, click “Recycle bin” in the left-hand sidebar.

The Recycle bin on OneDrive

Here, click the notebook that you want to recover on the right pane. Then, click “Restore” at the top to put your notebook into its original location.

Recover OneNote notebooks with OneDrive

Go to that original location in OneDrive (which is usually the Documents folder) and click the notebook to open it with OneNote for web.

Credit to: How To Geek - Mahesh Makvana


 If you find an old cell phone in a drawer somewhere, there’s a good chance it can’t connect to modern cellular networks. It won’t find a signal. By 2022 or 2023, many more old cell phones, including the iPhone 4, will be cut off. But why?

Landline Phone Technology Dates Back to the ’60s

A vintage touch-tone telephone on a wooden table.
JoeyPhoto/Shutterstock.com

If you find an old push-button telephone in a closet, you can probably still connect it to your landline and it’ll work just fine. That’s because these phones have used the dual-tone multi-frequency (DTMF) technology standard since 1963. In other words, that phone from the ’60s will still work with a modern telephone landline because they use the same technology.

(Before that, rotary telephones and some early push-button telephones used something called pulse dial signaling. They won’t work when plugged into a modern landline—not unless you buy a converter.)

Cellular Standards Are Quickly Changing

Cellular technology is very different. We’re not using a standard that dates back decades anymore. Instead, technology companies are regularly coming out with new standards: 5G was first used in 2018, 4G in 2009, 3G in 2001, 2G in 1991, and 1G in 1981. The “G” stands for Generation—5G is the fifth-generation cellular standard.

These new standards offer a variety of improvements, but they improve the fundamentals, too: Newer standards are generally faster and provide a stronger signal. That’s how we went from slowly browsing the web on the original iPhone (or a BlackBerry) to streaming high-resolution videos on modern smartphones.

New cellular standards take some time to become widespread and appear in the products they use. Not every phone sold since 2018 is a 5G phone, for example: The iPhone gained 5G support for the first time in 2020.

Modern Networks Don’t Support Old Standards

A hand holding a first-generation iPhone.
marleyPug/Shutterstock.com

While cellular standards are changing quickly, that’s not exactly the reason why old phones can’t connect to modern networks. The precise reason is that cellular carriers drop support for old standards to free up resources for new standards.

For example, as of early 2021 in the U.S., the big carriers all support 5G, 4G, and (for now) 3G. They no longer support 2G or 1G.

Let’s say that you have a first-generation iPhone, also known as an iPhone 2G. It’s a classic! But you can’t use it on a modern cellular network today: It only supports 2G. (If you’re an Android fan, take pride in the fact that the first Android phone, the HTC Dream/T-Mobile G1, started out with support for 3G.)

The iPhone only gained support for 3G with its second-generation model, which was called the iPhone 3G. That iPhone 3G can still connect to modern networks—for now, at least, until they drop support for 3G.

Why Networks Drop Support for Old Standards

Maintaining support for older cellular standards is a trade-off. As AT&T argued in a press release when it shut down 2G at the beginning of 2017, phasing out 2G freed up more wireless spectrum that could be used for newer standards—in particular, making the 4G network faster.

Like Wi-Fi, cellular connections are just radio waves. And also like with Wi-Fi, cellular providers only have a specific range of radio frequencies that they can use for their networks. If they use a “band” of that spectrum to keep 2G going, they can’t use that same band for 4G. If they shut down their 2G network, they can reallocate that band (portion of the wireless spectrum) to newer, faster networks that more devices are using.

After all, people upgrade their devices frequently. When the vast majority of people are using modern devices that support the latest standards and only a few people are using older devices, there’s very little reason to keep those old networks running. It may be cheaper for a cellular network to offer discounted device upgrades—or even to give away free devices that support modern standards—to the few customers who are holdouts, rather than to spend resources keeping an old network running.

This doesn’t mean that you can’t keep using feature phones—but you have to buy a modern feature phone with support for modern cellular standards. (Yes, they do exist!)

3G Is Going Away in 2022 or 2023 (in the US)

A cellular tower over West Virginia.
Steve Heap/Shutterstock.com

As of early 2021, there are some big 3G shutdowns coming in the next few years. Cellular carriers in the U.S. say that they will shut down their legacy 3G networks in 2022 or 2023. Only devices that support 4G or 5G will then be able to connect.

The exact details are still up in the air. Verizon said that it would shut down its 3G network at the end of 2020, but in early 2021, the company reportedly set a new target of 2023. AT&T says that it’s shutting down 3G in 2022. T-Mobile plans to phase out its 3G networks through late 2021 and early 2022.

When that happens, your old iPhone 3G, iPhone 3GS, iPhone 4, or iPhone 4S won’t connect to a cellular network anymore. (Android phones from before the 4G era will be cut off, too.)

But the iPhone 5 will still connect. It was the first iPhone to support 4G, and it was released in 2012. (Android phones with 4G support will still connect, too. The first Android phone with 4G was the HTC Evo, released in 2010.)

A Decade Is a Long Time, but Not by Historical Standards

Realistically, most phones released in the past decade will still be able to connect when these networks are shut down. That’s still a pretty generous period of time.

But it’s pretty short compared to historical precedents: By 2022, we imagine you’ll still be able to connect that touch-tone phone from the 1960s to your landline.

Credit to: How To Geek - Chris Hoffman


Your credit score is an important indicator of your financial health, so it’s crucial to develop good credit habits to build and maintain a good credit history. Learn and avoid common credit mistakes that can stifle your progress and even damage your credit score for years to come.

Mistake 1: Co-signing a loan

If a friend or relative can’t get loan approval on their own, there is usually a problem with their credit standing. If the borrower doesn’t pay as agreed, you’ll have to repay the debt and the relationship will be ruined.

Be gentle and tactful in saying no. You can instead suggest that the person try to fix their credit health first before applying for a loan – a good way for them to start is by checking their credit report and seeking financial counselling.

Mistake 2: Not paying bills on time

Payment history has a big impact on your credit score with a 45% weightage, so missing even one payment could wreak havoc on your credit and may result in fees and penalties.

Late payment will stay in CCRIS/CTOS data for 24 months and it will be used in credit score calculation. While its impact on your score may diminish over time with new positive information, it can still hamper your credit growth the entire time it’s on there.

To ensure you pay all your bills on time, request payment reminders from your lenders or, even better, set up autopay through your bank account. Just make sure you have enough money in your bank account each month to cover your bills.

Mistake 3: Only checking your credit report when there’s a problem

Your credit report contains a lot of crucial information, such as your credit score, CCRIS details, directorship and business interests, litigation and more. If you only check your report when there’s a problem, it will take a much longer time to fix things later.

Checking your credit report regularly enables you to spot problem areas or inaccuracies early, so you can take immediate steps to correct them. That way, you’ll be credit-ready when you need to be, for instance if you need to apply for a loan.


Credit to: Ctos Credit


If you want to send a private message to someone and ensure that they are the only ones who read it, protecting it with a password only the recipient knows is a solid choice. Fortunately, secure email providers ProtonMail and Tutanota make this process easy and highly secure, and you can use both for free.

Why Send a Password-Protected Email?

When you send an email to a standard webmail address like Gmail, the server receives the email and notifies the recipient. The server can see the entire contents of the email, and any devices set up for use with that email address can notify the recipient of a new message.

This usually takes the form of a push notification with a visible subject line and a preview of the message contents. Even on a mobile device that’s locked, this can give away information to anyone looking over the recipient’s shoulder.

Email Notification on an iPhone

On a shared computer or tablet, the email might download automatically via clients like Apple Mail. All it takes is a click or two to read the entire content, regardless of whether the email was intended for someone’s eyes or not. The message might be indexed by local search engines and may show up at other times.

If the message in question is sensitive, this might not be ideal. If you’re serious about having only the intended recipient see the contents of your email, protecting it with a password seems like an obvious choice. As long as you can communicate the password to the recipient privately, your message can be read without the risk of anyone else seeing it first.

In particular, the services we’ll be using today don’t transfer any of your messages (except for the subject line) to the recipient’s email server. This means that the message contents won’t even show up when searched for in a webmail or desktop client.

Sending Password-Protected Email with ProtonMail

ProtonMail is one of the web’s best-known secure email providers. The service is based in Switzerland, where data protection laws are strict. It uses end-to-end encryption, so that email contents are stored in an encrypted format that not even ProtonMail’s servers can decrypt.

ProtonMail Inbox
ProtonMail

ProtonMail automatically encrypts all messages between users of the service, with an option to use PGP encryption for contacts who are using other email services. But there’s also an option to simply send a password-protected email to anyone, regardless of which email service they use.

To do this, you’ll need to sign up for a free ProtonMail account. You don’t need to provide your name, an existing email address, or any other identifying personal information.

Compose a New Email in ProtonMail

Once you’ve signed up and logged in, click on the “Compose” button in the top-left corner of the screen to begin writing your message. When you’re ready to send your message, click on the Encryption “padlock” icon along the bottom of the compose window.

Encrypt for non-ProtonMail Users

This is where you can set your password (which must be typed twice for confirmation) as well as an optional password hint. If you’re sending mail to someone and you haven’t communicated a password to them already, you can use the hint field to prompt them to enter a password that only they would know.

Secure Email with a Password

Hit the “Set” button to lock your email. You can now click on the Expiration time “hourglass” icon to determine when your email expires. All emails sent via this method will expire within 28 days by default, but you can pick a shorter time period if you like. When you’re ready, hit Send to finalize your message.

Set Email Expiry Date

Everything except the subject line and the recipient will be encrypted and hidden. The recipient will receive a notification that they have a password-protected email and a link waiting for them. When the link is clicked, a password field will appear, which can be used to decrypt the message.

Sending Password-Protected Email with Tutanota

Tutanota is another well-known and trusted secure email provider. The company is based in Germany, a country with some of the strongest data protection laws in the world. Tutanota also uses end-to-end encryption so that data on the server is only visible to the person who owns the email account.

Tutanota Inbox

Like ProtonMail, Tutanota also encrypts messages between users of the same service. Tutanota also includes a password-protected email mechanism that works almost identically to ProtonMail’s, except that Tutanota’s implementation also encrypts and hides the subject line, too.

To send mail via Tutanota, sign up for a free account. Just like with ProtonMail, you don’t need to provide identifying information to sign up. Just pick a username and a password, and away you go. Once you’re signed up and logged in, click on the “New email” button to begin composing your message.

Compose Email in Tutanota

Enter an email address into the “To” field to reveal an optional password field. You can toggle the password requirement using the secure “padlock” icon in the subject field. Tutanota will remember the last password you set for the email address supplied—or you can set a new one.

Password-Protect Email in Tutanota

With your message composed, hit Send, and Tutanota will deliver a message notifying the recipient that there is an encrypted email waiting for them. When they click the link in this email, a password field can be used to decrypt the message so that it can be read.

Like with ProtonMail, Tutanota’s password-protected messages also expire. Your message will be available at the supplied link until the next time you send a password-protected message to the same email address.

How Is This More Secure Than Webmail?

The beauty of this solution is that the contents of your messages (except for ProtonMail’s subject line) never even touch the recipient’s email servers. Nothing you say will be visible in an unencrypted format, since the message contents only ever exist on ProtonMail or Tutanota’s servers.

If your email provider is required to hand over the contents of your inbox due to a legal request, the contents of the email won’t be saved anywhere. The same thing applies if there’s a data breach and your inbox is compromised.

This means that the contents of your message cannot be scanned by Gmail’s AI, indexed by local search features on a mobile device or desktop, or appear in a push notification. The most a recipient will see before decrypting the message with a password is a notification that there’s an email waiting for them.

ProtonMail Messaged Encrypted for All Email Accounts

There are drawbacks to this method too. Many people are unwilling to click on links in email messages, and it’s even possible that some spam filters could incorrectly divert your encrypted mail to junk. Also, since the messages expire, it might be easy to lose them, especially if the recipient hasn’t realized that they’re there.

It’s also not an infallible system. Someone could guess the password, or the recipient could pass the link and password on to other people. Never assume that information is safe purely because it was password-protected at some point.

Why Not Use Gmail or Outlook?

The best native protection that Gmail has to offer in this department is the confidential email feature. This uses a one-time passcode to prove that the person opening the email has access to the mailbox it was sent to, but this method isn’t much use if the inbox has already been compromised.

Outlook also offers some protection using S/MIME encryption, which requires certificates to be set up on your device and that the recipient uses a mail application that supports the standard. It’s a far cry from simply entering a password, and it doesn’t work with the webmail version of Outlook, either.

What About Sharing the Password?

How you deliver the password could be just as important as this process. If possible, do so in person so that you know that the person you are speaking to is who they say they are. Failing this, you could use a secure messaging service like Signal to send a self-destructing message.

Credit to: How To Geek - Tim Brookes


Bitwarden and KeePass are two excellent password managers that stand out from the pack by being entirely open source and almost completely free (Bitwarden has an optional paid plan.). There are some important differences, though. Here’s how to choose between them.

Using Bitwarden vs. KeePass

The most striking difference between Bitwarden and KeePass is the interface. Both interfaces are a lot less slick than those of commercial password managers like LastPass and 1Password, however.

KeePass takes this to an extreme with a desktop application interface that’s straight from the ’90s. That’s no huge surprise, as it’s been around since 2003.

KeePass' main screen

KeePass is a much more classic desktop application for “power users.” For example, its menus are rather jargon-filled compared to modern paid password managers.

This application runs on Windows, Linux, and Mac, although it’s written in .NET and the non-Windows clients run through the Mono framework.

A KeePass menu

Bitwarden, on the other hand, offers a more modern, streamlined user experience befitting of a program that was launched in 2016.

Although it’s not as sleek as, say, LastPass, it’s a lot more straightforward and much more thought-out than KeePass in this regard. It just looks better and is a lot more intuitive to use. It also works on Windows, Mac, and Linux as well as on Android and iPhone.

Bitwarden's main screen

The differences between KeePass and Bitwarden run more than skin-deep, of course. Besides being easier on the eyes, Bitwarden is also easier to use thanks to having web browser autofill and built-in automatic sync.

Autofill is the very handy ability to have your password manager automatically fill in the username and password fields on any website that you want to access. It’s what elevates password managers from being merely useful to being time-savers: Not only do you not need to remember passwords, you also don’t need to type them out.

Automatic sync (short for “synchronization”) is when you can use the same program on different devices (like your laptop and smartphone) and have the information automatically transferred between them. Any account that you create on your laptop, you can autofill on your smartphone, for example. Bitwarden does this automatically (and with credit card and ID numbers, too), while KeePass makes you transfer the file with your passwords manually.

Adding new items to Bitwarden

Autofill and sync are some of the handiest features that a password manager can have, and it’s hard to recommend any program that’s lacking one, let alone both. However, KeePass has an ace up its sleeve in the form of its plugins.

KeePass Plugins

Whereas Bitwarden is a program that’s put out by a company, much of KeePass’s functionality outside of the base software is provided by its community through plugins. These are extensions of the program that add a specific function to KeePass or even run it on Android devices, iPhones, and iPads.

The KeePass community is extremely active and offers all kinds of plugins, including ones that can add autofill and automatic sync, so you could just add that functionality that way. In most cases, adding a plugin is pretty easy on KeePass: You can download and unpack the file into the KeePass directory, and then add the plugin via the menu in the main KeePass client, although some plugins may require additional steps.

However, there’s the question of whether adding plugins is something you actually want to do in the first place. As password managers are supposed to be programs that make life easier, it might seem counterintuitive to some to add a whole bunch of extra steps to add some functionality that other software, like Bitwarden, have built in out of the box.

That being said, KeePass’s plugins are very useful for tech enthusiasts who like to tinker with programs. When using the right plugins, for example, you can completely change the look of KeePass or add functions that many of its competitors don’t offer, like automatic backup or advanced scripting.

In short, the difference between KeePass and Bitwarden when it comes to usability is that Bitwarden is easier to use. But generally speaking, when using it as its developers intended, KeePass gives you a lot more flexibility, but at the cost of being harder to use.

As such, KeePass could be a great fit for people who already know their way around a computer, while Bitwarden is probably a better option for people who are looking for a more consumer-friendly solution.

Bitwarden vs. KeePass Security

So far, we’ve discussed the main differences between Bitwarden and KeePass. Now, let’s examine some important similarities between them. Whichever you end up choosing, your passwords and any personal data you uploaded will be safe. Bitwarden stores your passwords in the cloud, but encrypts them on your machine using the “military-grade” AES-256 cipher, meaning that they’re unreadable to anybody looking at them on the server. The company is also regularly audited by third-party security firms to ensure that customer data is safe.

KeePass uses the same encryption key, but stores all passwords on your computer, meaning that you need to make sure that nobody who isn’t supposed to have access gets close to it. However, even if somebody does get access, KeePass also encrypts your passwords. It uses AES-256 by default, but you can also choose from among other options, like ChaCha20.

On top of that, both programs are completely open source, meaning that anybody can look at their code on GitHub and see whether there are any issues with it. Bitwarden also allows people to report any bugs or security flaws that they find and receive a bounty.

As with all password managers, the only real weakness is your master password, which is the one you use to access the program. In the case of KeePass and Bitwarden, this particular problem is unknown to them. This means that if you lose your master password, it’s lost forever. At the same time, it also means that there’s no way for anybody to find out what it is unless you give it to them.

Are KeePass and Bitwarden Free?

The good thing about both programs is that they’re completely free, although you can donate to the people behind KeePass if you’d like to support them. Bitwarden’s free plan is a fully functional password manager, and as such, you never need to pay for it, although it does offer some advanced functions for paying customers.

Bitwarden offers a Premium Account for $10 per year, and offers more options when it comes to integrating two-factor authentication solutions (like YubiKey or U2F Key) and vault health reports, which analyze the security of your passwords. The Family/Organization Plan is $40 per year and allows you to share the account with up to six users. This means that everybody can share some secure data—it’s useful for family Netflix accounts or the company VPN.

The Bottom Line

When choosing between Bitwarden and KeePass, in the end, your choice will probably come down to what you want from a password manager. If you want something flexible that gives you a lot of freedom to customize it to your tastes and needs, then KeePass is the better choice.

If, however, you want something that you can get running without much hassle, then Bitwarden is better.

In either case, you won’t have to spend a penny, and your passwords will be safe.


Newer Posts Older Posts Home

ABOUT ME

I could look back at my life and get a good story out of it. It's a picture of somebody trying to figure things out.

SUBSCRIBE & FOLLOW

POPULAR POSTS

  • How to Use “Here Documents” in Bash on Linux
  • How to Use the LEN Function in Microsoft Excel
  • 10 Spring Cleaning Tips for Your Windows PC
  • Inai oh Inai ... Apa Hukumnya ???
  • 10 Rahsia Lobak Merah
  • Jom Kite Kahwin... hehe..
  • 5 Factors That Impact Your Credit Score
  • (no title)
  • Bitwarden vs. KeePass: Which Is the Best Open-Source Password Manager?
  • 7 Kunci Kejayaan

Categories

  • BABY 2
  • Benci kata cinta 1
  • DIARY 44
  • IT HACK 19
  • LIFE HACK 37
  • MONEY MAGNET 4
  • MOTIVATION 29
  • MOVIES 3
  • NEWS 8
  • RECIPES 11
  • REVIEW 1
  • TRAVEL 1

Followers

Advertisement

Owned Copyright. Powered by Blogger.

VISITORS

blog counter
seedbox vpn norway

VISITORS

Flag Counter

Search My Post

ARCHIVE DIARY

  • ▼  2024 (12)
    • ▼  Dec (2)
      • 5 Factors That Impact Your Credit Score
      • How quickly your CTOS score will change?
    • ►  Aug (1)
    • ►  Jul (1)
    • ►  Jun (1)
    • ►  May (7)
  • ►  2023 (3)
    • ►  Oct (2)
    • ►  Sep (1)
  • ►  2022 (1)
    • ►  Mar (1)
  • ►  2021 (31)
    • ►  Dec (1)
    • ►  May (5)
    • ►  Apr (13)
    • ►  Mar (3)
    • ►  Feb (8)
    • ►  Jan (1)
  • ►  2020 (24)
    • ►  Nov (4)
    • ►  Oct (1)
    • ►  Sep (6)
    • ►  Aug (1)
    • ►  May (9)
    • ►  Apr (3)
  • ►  2017 (1)
    • ►  Feb (1)
  • ►  2016 (1)
    • ►  May (1)
  • ►  2015 (1)
    • ►  Nov (1)
  • ►  2014 (8)
    • ►  Oct (1)
    • ►  Aug (1)
    • ►  Jul (3)
    • ►  May (3)
  • ►  2013 (1)
    • ►  Jan (1)
  • ►  2012 (37)
    • ►  Dec (6)
    • ►  Sep (2)
    • ►  Aug (5)
    • ►  Jul (11)
    • ►  Jun (4)
    • ►  May (3)
    • ►  Apr (1)
    • ►  Mar (5)
  • ►  2011 (7)
    • ►  Dec (2)
    • ►  Aug (1)
    • ►  Mar (2)
    • ►  Feb (2)
  • ►  2010 (3)
    • ►  Dec (3)

Pages

  • My Heart Says
  • Egokah cinta
  • My Superb Backbone!
  • Exchange Links
  • Contact Me
  • Social
  • Motivation
  • Travel
  • Life's of Princess.
  • Giveaway
  • Money Magnet
  • Tips Beauty
  • Recipes
  • Download Movies
  • Halo Telco

Followers

YOUR FINANCIAL ADVISOR

YOUR FINANCIAL ADVISOR

Contact Form

Name

Email *

Message *

Designed by OddThemes | Distributed by Gooyaabi Templates